by Roderick W. Smith, rodsmith@rodsbooks.com
Originally written: 4/24/2016; last Web page update: 3/13/2021, referencing rEFInd 0.13.2
This Web page is provided free of charge and with no annoying outside ads; however, I did take time to prepare it, and Web hosting does cost money. If you find this Web page useful, please consider making a small donation to help keep this site up and running. Thanks!
| Donate $1.00 | Donate $2.50 | Donate $5.00 | Donate $10.00 | Donate $20.00 | Donate another value |
This page is part of the documentation for the rEFInd boot manager. If a Web search has brought you here, you may want to start at the main page.
Once you've installed rEFInd, you may face a new challenge: Keeping it set as your default boot manager. Users of multi-boot computers have long faced similar challenges, because most OSes provide mechanisms to keep themselves booting, even at the cost of disrupting other OSes—or overriding your own choices. On this page, I refer to such unwanted changes as boot coups. Experienced multi-booters know the tools and techniques to avoid or recover from boot coups. If you're new to the EFI world, though, most of the techniques you may know for helping with BIOS-mode booting don't apply to EFI-mode booting.
This page describes tools and techniques you can use to keep rEFInd set as your default boot manager, or at least to recover it as the default boot option if something else takes over. This page is organized by OS, describing the tools and techniques you can use in each OS to recover from a boot coup—or in some cases, to prevent one from occurring. I begin and end with information on firmware-based tools, though. Chances are you should not read this page straight through; instead, peruse the Contents to the left and pick an OS and, perhaps, a recovery tool or technique you wish to pursue and read the relevant section. In most cases, the recovery technique is fairly quick and painless, once you understand how to do it. Note also that, in extreme cases, a full rEFInd re-installation may be required. It may also be easier to re-run refind-install than to learn about esoteric commands such as efibootmgr, bless, or bcdedit.
Most EFIs provide their own built-in boot managers. These tools are primitive, and in some cases they can be difficult to reach, but they can be useful if you need to bypass a new system default in order to boot an OS that has the tools you need to control the boot process.
On Macs, holding the Option key (or Alt with a PC keyboard) while powering on the computer brings up the Mac's boot manager. Typically, the Esc key, Enter key, or a function key (usually F8 or above) does the job on UEFI-based PCs. Some computers provide a prompt for what key to use to access the boot menu, but this isn't always true. Sometimes the keyboard is disabled in the early stages of the boot process by default—part of a strategy to speed up system boots. Disabling a "fast start" feature in the firmware may work around this problem. Getting into the firmware can be a challenge on such computers, though. Microsoft provides a way to do this in Windows 8 and later; see this How-To Geek article for documentation on how to use this feature. If a Linux distribution uses the popular systemd initialization system, you can type systemctl reboot --firmware as root (or using sudo) to do the same from Linux.
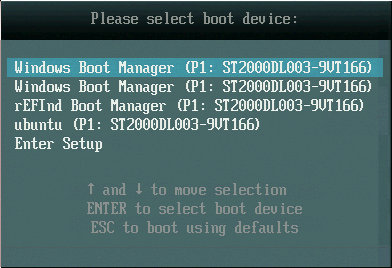
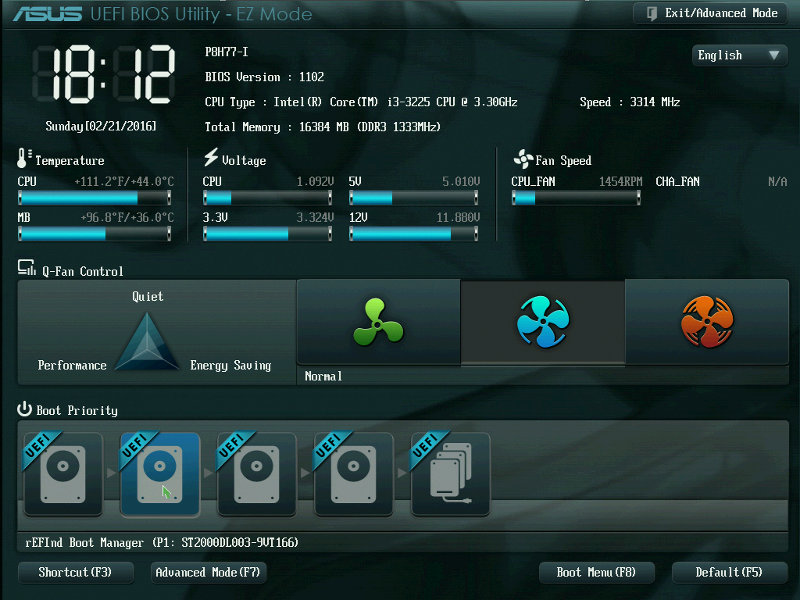
Once you've found the built-in boot manager, you'll see its display, which is typically a text-mode listing of boot options. On UEFI-based PCs, the user interface is typically similar to the one used in years past on BIOS-based computers to select the boot device; it's simply been upgraded to include the descriptions held in NVRAM for specific boot loaders. (In fact, prompts are often outdated and misleading; as in the below example, they may refer to "boot devices," when in fact most of the options are EFI boot loader programs, not hardware devices.) As an example, an ASUS P8 H77-I's boot manager looks like this:
You typically select the option you want to boot by using the arrow keys, then hit the Enter key to boot it. If rEFInd is working but has been overridden as the default, you can select it; or if your preferred OS has its own option, you may be able to launch it directly.
Keep in mind, though, that some of the options on the built-in boot manager's menu may not work, or may work in unexpected ways. For instance, you might see options to boot hard disks in BIOS/CSM/legacy mode. These options might not work; and even if they do, they'll boot the computer in BIOS mode, so you won't be able to use the tools described on this page to correct your boot problems.
The most general, and in some cases the easiest, solution to a boot coup is to re-install rEFInd. If you haven't updated rEFInd in a while, this approach has the advantage of providing an update to rEFInd (assuming you first download the latest version). The Installing rEFInd page describes how to install rEFInd from Linux, macOS, Windows, an EFI shell, or from rEFInd booted from a removable medium. The refind-install script and installing from rEFInd both preserve your existing refind.conf configuration file, so an upgrade should not affect your customizations. (The rEFInd icons will be updated to the latest versions, but refind-install moves the original icons to a backup directory, so you can restore them if you've customized them or if they've changed and you don't like the new icons.)
One possible complication to this approach is if you're stuck booting in an unfamiliar OS. In such a case, you may be able to boot into your preferred OS on a one-time basis by using your computer's built-in boot manager, as described in the previous section. The trouble is that how you do this varies greatly from one computer to another.
Linux's primary tool for adjusting the EFI boot order is efibootmgr. If you installed rEFInd from Linux, chances are you used this tool, even if you don't realize it. (The refind-install script calls efibootmgr, and this script is called automatically by the rEFInd RPM and Debian packages.) The easiest way to do this is to use the refind-mkdefault script. A more complex but flexible approach is to use efibootmgr directly. I also describe some steps you can take to make it less likely that Linux will stage a boot coup to begin with, thus obviating the need to perform a repair.
Since version 0.10.3, rEFInd has shipped with a script called refind-mkdefault, which uses efibootmgr to identify rEFInd and set it as the default (first) boot option. Use of this script is quite simple: Launch it as root (or via sudo):
$ sudo refind-mkdefault
rEFInd is not the first boot entry; adjusting....
Setting a boot order of 0000,0002,0085,0003
The exact output of the script depends on the current state of the system; it might also respond that rEFInd is already the default boot entry or that it could not identify a rEFInd entry, for instance. The boot order shown in this example is meaningless by itself. It's the boot order as identified by efibootmgr; for details, see the next section.
Instead of using refind-mkdefault manually, you might consider running it automatically at every boot or shutdown. You can, for instance, call it from /etc/rc.local or create a script in /etc/rc6.d that calls it to have it run when you start up or shut down the computer, respectively. Details, however, vary from one distribution to another, so you should consult your distribution's documentation for information on startup and shutdown scripts. If you use it in this way, rEFInd should correct a boot coup caused by an update to GRUB; however, this repair will happen only after a reboot if you call refind-mkdefault in a startup script. If you call it from a shutdown script, rEFInd should correct such a coup before it has a chance to cause problems; but then it won't run if the computer crashes. Note that refind-mkdefault does not touch the NVRAM variables if rEFInd is already the default boot option. Thus, calling this script as a regular part of your startup or shutdown procedure poses little risk of causing problems because of unnecessary NVRAM writes. If you decide to stop using rEFInd, though, you'll have to remember to remove the call to refind-mkdefault from your startup and shutdown scripts.
If you've given the rEFInd entry an unusual name, you can pass the script the -L name or --label name option, as in:
$ sudo refind-mkdefault -L ubuntu
This example moves an entry that contains the string ubuntu (case-insensitive) to the top of the boot order. Thus, refind-mkdefault can set any boot program as the default, so long as it's already registered with the firmware. The script searches the entirety of output lines created by efibootmgr -v (as described shortly), and so it matches on descriptions, filenames, and even the obscure EFI codes that identify devices.
Adjusting your boot order using efibootmgr is a two-step process: First you must identify the existing boot entries. With that done, you specify a new boot order. You can identify boot entries by typing efibootmgr alone (as root or via sudo):
$ sudo efibootmgr
BootCurrent: 0000
Timeout: 0 seconds
BootOrder: 0002,0000,0085,0003
Boot0000* rEFInd Boot Manager
Boot0002* Windows Boot Manager
Boot0003* Windows Boot Manager
Boot0085* ubuntu
In this example, labels were clear and accurate; you can see that the BootOrder line identifies a boot order of Boot0002 (Windows) followed by Boot0000 (rEFInd), then various others. If you're in doubt about your entries, you can examine more complete output with efibootmgr -v:
sudo efibootmgr -v
BootCurrent: 0000
Timeout: 0 seconds
BootOrder: 0002,0000,0085,0003
Boot0000* rEFInd Boot Manager	HD(1,800,113000,2491a00e-2a89-4dc4-af21-34c436c8f88a)File(\EFI\refind\shimx64.efi)
Boot0002* Windows Boot Manager	HD(2,113800,113000,8b0b6d94-06af-4894-b9de-13ca354714a5)File(\EFI\Microsoft\Boot\bootmgfw.efi)WINDOWS.........x...B.C.D.O.B.J.E.C.T.=.{.9.d.e.a.8.6.2.c.-.5.c.d.d.-.4.e.7.0.-.a.c.c.1.-.f.3.2.b.3.4.4.d.4.7.9.5.}....................
Boot0003* Windows Boot Manager	HD(1,800,113000,2491a00e-2a89-4dc4-af21-34c436c8f88a)File(\EFI\Microsoft\Boot\bootmgfw.efi)WINDOWS.........x...B.C.D.O.B.J.E.C.T.=.{.9.d.e.a.8.6.2.c.-.5.c.d.d.-.4.e.7.0.-.a.c.c.1.-.f.3.2.b.3.4.4.d.4.7.9.5.}....................
Boot0085* ubuntu	HD(1,800,113000,2491a00e-2a89-4dc4-af21-34c436c8f88a)File(EFI\Ubuntu\grubx64.efi)
Much of this output looks like gibberish, and is useful only for very advanced diagnostics. Note, however, the part of most lines that specifies a filename, in parentheses after File—this information can help disambiguate a misleading or duplicate name. In this example, for instance, there are two Windows Boot Manager entries on two different partitions; each boots a different version of Windows.
To adjust the boot order, you must identify the rEFInd entry and then use the -o option to efibootmgr to adjust the order:
$ sudo efibootmgr -o 0000,0085,0002,0003
BootCurrent: 0000
Timeout: 0 seconds
BootOrder: 0000,0085,0002,0003
Boot0000* rEFInd Boot Manager
Boot0002* Windows Boot Manager
Boot0003* Windows Boot Manager
Boot0085* ubuntu
In this example, I moved rEFInd to the top of the list, followed by ubuntu (GRUB) and then the two Windows installations. You can adjust the order in any way you want. You can also omit items you don't want to include—but be aware that if you omit Windows entirely from the boot list, it's likely to add itself back (at the top of the list) the next time you boot it.
Once Linux is installed, the usual cause of a Linux boot coup is an update of GRUB. Such updates are relatively rare, but they can happen at any time when the distribution maintainer pushes out a version of GRUB with a bug fix. Therefore, one way to prevent a Linux boot coup is to disable such updates. Unfortunately, the details of how to do this vary from one distribution to another. Furthermore, disabling such updates has its drawbacks.
One problem with disabling GRUB updates is that you'll be cut off from the benefits they bring—GRUB updates are normally distributed because they contain important bug fixes. These updates might even be security-related. Of course, if you're booting via rEFInd without involving GRUB, you may not care about such updates. This possibility suggests the first way to disable GRUB updates: Remove GRUB entirely.
To remove GRUB, you must employ your package management system. For instance, on an RPM-based system, you might type:
# rpm -e grub2 grub2-efi grub2-tools
On a system that uses Debian packages, a similar command is:
# dpkg -P grub-efi-amd64 grub-efi-amd64-signed grub-common grub-efi-amd64-bin \
  grub2-common grub-pc-bin shim-signed os-prober
The details of what packages you must remove vary from one distribution to another, though. (The preceding examples are from Fedora and Ubuntu installations.) If you're unsure what packages to remove, you may need to use your package management tools to track down all GRUB-related packages. GUI tools, such as Yumex for Fedora and Synaptic for Debian-based systems, can be very helpful in this task. Unfortunately, you must sometimes remove packages that you might not want to remove—for instance, the preceding example removes shim-signed from Ubuntu because shim-signed contains a dependency on GRUB, but rEFInd can use Shim for its Secure Boot support. Fortunately, if rEFInd is already booting via Shim, removing the shim-signed package will not remove the shimx64.efi binary from rEFInd's directory, so the system will continue to boot—but you also won't receive any Shim updates that might roll along.
Note also that removing the GRUB packages will not remove the files installed to the EFI System Partition (ESP), so rEFInd will continue to show a GRUB option, normally with an icon for your distribution, in its main menu. If you want to remove that menu entry, you can delete the relevant files, normally from /boot/efi/EFI/distribution_name.
An added bonus to removing the GRUB packages is that you will no longer have to wait while GRUB's scripts scan your system every time your kernel updates. (Such scans can take well over a minute on a system with lots of installed OSes, which can be quite annoying.) Of course, these scans keep the GRUB menu up-to-date, so if they stop, GRUB will eventually stop working, even if you leave its binaries installed on your ESP.
One limitation to removing GRUB packages is that your distribution may try to re-install GRUB. As a workaround for Ubuntu systems, I use this dummy package, which claims to be "GRUB 3"—a version high enough that no GRUB 2 update should ever try to displace it. My "GRUB 3" dummy package contains nothing but a few empty directories.
A less radical approach to preventing boot coups related to GRUB updates is to use your packaging system to lock the current version in place. You can do this with Debian-based installations with the apt-mark hold command, as in:
# apt-mark hold grub-efi-amd64 grub-efi-amd64-signed grub-common grub-efi-amd64-bin \
  grub-common grub2-common
You can achieve a similar result in Fedora by installing the yum-plugin-versionlock package, ensuring that enabled = 1 is set in /etc/yum/pluginconf.d/versionlock.conf, and editing /etc/yum/pluginconf.d/versionlock.list to include the names and versions of packages you want to lock at a particular version.
A boot coup that leaves a computer booting straight to macOS was most likely caused by an update to macOS—either a software update that installed a fresh copy of the macOS boot loader or a complete re-installation of the OS. In either event, the solution is conceptually similar to the Linux solution, but the tools you use to correct the problem differ. In macOS, you would either use Startup Disk to set rEFInd as the default or use bless to do the same.
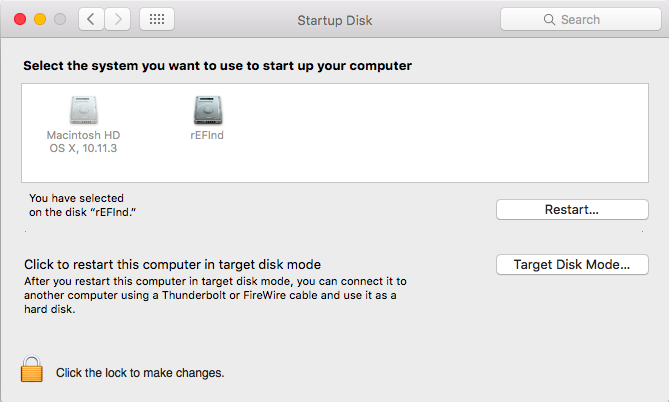
The Startup Disk utility appears in the System Preferences tool. Unfortunately, it will likely be useless if you installed rEFInd using refind-install and its default options, since Startup Disk is designed to switch between macOS installations; it's not smart enough to detect a rEFInd installation and re-activate it.
If, however, you installed rEFInd by using the --ownhfs option to refind-install, your rEFInd installation volume may show up as an option in the Startup Disk utility. You should be able to click on it and then click Restart. Note that the name of the rEFInd volume may not be rEFInd, as it is in this screen shot; the name will match whatever volume holds rEFInd on your computer.
As with most of the fixes described on this page, this method of recovering from a boot coup will not protect you from future boot coups. Fortunately, macOS updates that create boot coups are fairly rare, but you'll have to resign yourself to the fact that the problem may recur in the future.
The more general solution to resetting rEFInd as the default boot manager from macOS is to follow a subset of the manual macOS installation instructions. Unfortunately, some details depend on where rEFInd is installed—on the ESP, on the main macOS root (/) partition, or on a separate HFS+ volume. If rEFInd is installed on its own HFS+ partition, using Startup Disk, as described in the previous section, is likely to be the easier solution—if that approach works for you. For the other two options, or for a dedicated HFS+ installation if Startup Disk balks at making it bootable, you should first figure out where rEFInd is installed and then follow this procedure:
One major caveat is that the bless command will fail if System Integrity Protection (SIP) is active. This feature is part of macOS 10.11 (El Capitan) and later, and you will have dealt with it during rEFInd installation if it's active. See this page of the rEFInd documentation for more on this subject. You can use any of the procedures outlined there with reference to installing rEFInd for dealing with a boot coup, as well.
As with most of the fixes described on this page, this method of recovering from a boot coup will not protect you from future boot coups. Fortunately, macOS updates that create boot coups are fairly rare, but you'll have to resign yourself to the fact that the problem may recur in the future.
A couple of tools exist to help you manage the boot order in Windows. The easiest of these to use is the third-party EasyUEFI. Microsoft's bcdedit, though, has the advantage of working around a problem in which Windows keeps setting its own boot manager as the default. (This problem is rare, but crops up from time to time.)
The third-party EasyUEFI program is a user-friendly GUI tool for managing EFI boot entries. A free trial is available, but if you want to use it in the long term, you'll need to pay for it. If a Windows update resets Windows as the default boot program, you can use EasyUEFI to restore rEFInd as the default. Doing so is pretty straightforward:
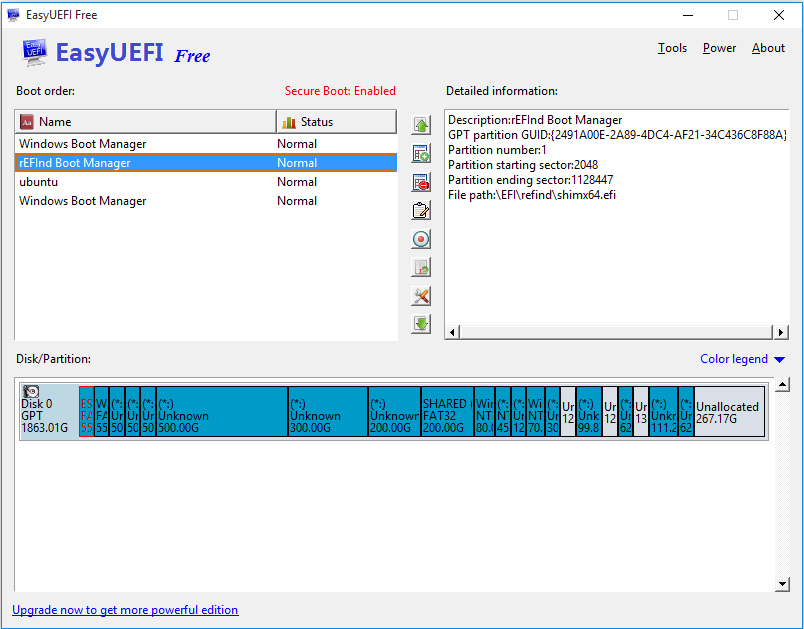
Note that EasyUEFI's menu shows the names of the boot entries. In some cases, rEFInd may be registered under another name. This is particularly likely if you used macOS's bless or Windows' bcdedit tools to register rEFInd with the firmware. You may be able to locate the rEFInd binary by examining the File path entry in the Detailed information pane, after selecting a "candidate" entry.
Like most of the remedies described on this page, this one makes an immediate change to the boot order but does not guarantee that the problem will not recur. In most cases, rEFInd will remain the primary boot program until it's changed again by another OS update, but all bets are off when that happens.
You can use a truncated version of the Windows installation instructions to restore rEFInd as the default boot manager:
This procedure, unlike the EasyUEFI one, creates a new boot menu item. It requires that you know the exact path to the rEFInd binary. (If you don't know this detail, you can mount your ESP, as described in the Windows installation instructions, and try to find it.) Overall, it's likely to be easier to use EasyUEFI; however, this procedure has one potential advantage: I've seen reports of cases in which Windows changes the default boot program on every boot. This procedure sometimes puts an end to such shenanigans. Thus, it can serve as a preventive measure against at least some future boot coups. I can't promise that it will work in all such cases, though. In particular, some EFIs, especially older ones, are buggy and ignore or forget their entries. Using bcdedit will not help protect against this problem.
rEFInd 0.12.0 introduced a new EFI boot order maintenance feature. This feature is primitive compared to some boot order maintenance tools, but it's adequate to recover from a boot coup, provided you can boot rEFInd once. To use it, the showtools line in refind.conf must include the bootorder option. This option is disabled by default, except on the USB flash drive and CD-R images I distribute; but if you regularly encounter boot coups, you may want to enable this feature. When it's active, a boot order icon will appear on the second row of rEFInd icons, as shown at the right. Selecting this option will produce a display of EFI boot options, as shown here:
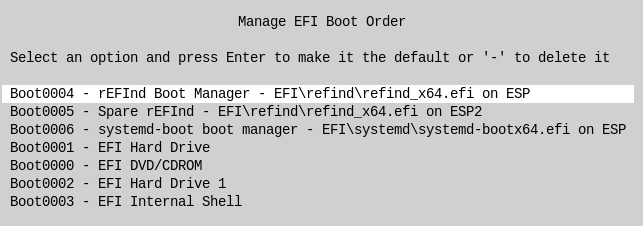
The list provides up to four pices of information about each boot entry: its boot number (such as Boot0004); its description (such as rEFInd Boot Manager); its filename (such as EFI\refind\refind_x64.efi); and its volume name (such as ESP). Sometimes one or more of these pieces of information can be missing. In the preceding example, for instance, the final four items on the list lack filenames and volume names. (This is common for entries created by the firmware for its own hardware devices.) If you can't figure out which entry you want to delete or elevate to the first position, I recommend booting into Linux or Windows and using efibootmgr or the commercial EasyUEFI, respectively.
You can use the arrow keys to move up and down in the list to select a boot entry. Once you've picked an option, you can perform any of three actions from this menu:
rEFInd's EFI boot maintenance tool does not enable you to fine-tune the order of multiple items all at once. You can do so by making repeated calls to the feature, however. For instance, to convert the entries shown earlier to a boot order of 0006, 0005, 0004, you would call the function twice — once to move 0005 to the top of the list and then to move 0006 there.
As with most of the fixes described on this page, this method of recovering from a boot coup will not protect you from future boot coups. Preparing a USB flash drive or CD-R with rEFInd on it can help you when boot coups occur, though, especially if the boot coup corrupts your boot list so that you can't start rEFInd. If you can boot from the external medium, you can use it to launch rEFInd and adjust the boot order, or even completely re-install rEFInd from the external disk.
Note that this feature adjust the EFI's boot order, not the boot order of loaders shown on rEFInd's screen. That order is determined by the order in which rEFInd detects different boot loaders, which is not easy to control.
If a boot coup has left your computer unbootable, or if the OS to which you're booting provides poor or non-functional tools for repairing a boot coup, you may be able to use your firmware to fix the problem. There are two basic approaches to doing so: using built-in firmware features (which may or may not be present, depending on your computer) and using an EFI shell (which may or may not be installed on your computer).
Some, but not all, EFIs provide the means to adjust the boot order themselves. The details of how this works vary greatly from one implementation to another, so I can provide only fairly broad guidance on this point. As an example, consider how to adjust the boot order with the ASUS P8 H77-I motherboard:
This procedure is only an example for one EFI. In fact, some EFIs, including the one in the ASUS P8 H77-I, feature multiple user interface modes. The ASUS has an "Advanced" mode, for instance, in which the procedure would be slightly different. They key point, though, is to locate whatever menu displays the boot order and use that menu to adjust it. Such a menu may be shown on the main screen, as in the case of the ASUS' "EZ-Mode," or on a menu you must select—often called "Boot" or something similar. Some EFIs, particularly for low-end fully-assembled desktop and laptop computers, lack this functionality altogether.
One other example (documented in more detail by Macworld) deserves mention. On many (maybe all) Intel-based Macs, you can adjust the boot order as follows:
This Mac-specific procedure presents only a limited selection of options. In particular, it will show macOS, bootable removable disks, and rEFInd installed to a dedicated HFS+ partition via the refind-install --ownhfs procedure; but it will not show rEFInd (or other boot programs) installed to the ESP, even if those options have EFI boot entries. Thus, it may not do what you need; but if you install rEFInd to an HFS+ volume, this procedure could be a useful tool for recovering from a boot coup.
As with most other fixes described on this page, recovering from a boot coup using your firmware's setup tools won't protect you from future boot coups. Most boot coups are caused by actions of an OS, so prevention must be handled on an OS-by-OS basis.
Version 2 of the EFI shell provides a command, bcfg, which can adjust the EFI boot order. Unfortunately, this tool is not present in version 1 of the EFI shell, and version 2 is reliable only with EFI version 2.3 and later, although at least one binary claims to work around that problem. To date (early 2021), most Intel-based Macs use EFI 1.1 (although some newer Intel-based Macs now have UEFI [EFI 2.x] firmware), and many PCs sold prior to Windows 8's release use UEFI versions prior to 2.3. Thus, this approach may not work for you.
Even if your computer works with a version 2 shell, it may not have one built in. In fact, most EFIs I've seen lack a built-in shell. If a shell is available, it should appear on the EFI's built-in boot manager, as described earlier, in Evading the Guards: Performing a One-Time Boot to Your Desired OS. If a shell is not built into your firmware, you can add one; here are a couple of links that may be helpful:
If you need to use the shell to overcome a boot coup, your best bet is to install it to a USB flash drive and boot from it. You can do so as follows in Linux:
At this point, you should have a working USB flash drive with an EFI shell. It should show up in your computer's built-in boot manager, as described earlier, in Evading the Guards: Performing a One-Time Boot to Your Desired OS. It will probably appear there under the brand name of the USB drive, perhaps with "UEFI" in the description. (If the boot medium shows up twice, select the option that includes "UEFI" in the description.) One major caveat is that the EFI shell is not signed with a Secure Boot key, so to use it on a computer with Secure Boot active, you must disable Secure Boot.
Once you've booted the EFI shell, you can follow a subset of the EFI shell rEFInd installation instructions to repair the boot coup:
With any luck, rEFInd will be restored as the default boot manager at this point. As with most of the methods described on this page, this procedure will do nothing to prevent future boot coups, so you may need to repeat the process in the future.
Because of the complexity of the procedure for starting an EFI shell if one is not already prepared, this procedure works best if one is built into your EFI or if you already have one ready.
If your computer simply refuses to boot into rEFInd, chances are your firmware is either ignoring its boot entries or forgetting them. For the most part, which is the case doesn't really matter, since the solutions are similar for both cases. There are a few exceptions, though; for instance, an entry will be ignored if it's malformed—such as if the filename specification includes a typo. Also, there is at least one known bug that causes the computer to ignore boot loader entries except for those named "Windows Boot Manager" or "Red Hat Enterprise Linux." Such problems can be fixed by creating a fresh NVRAM entry for rEFInd that fix the typo or give the entry the name that the EFI expects (even if it's a misleading name).
More common are problems in which the firmware ignores or forgets its boot entries. Such problems used to be quite common, but are becoming rarer as manufacturers (slowly) improve their products. My general advice for fixing such problems is to attempt each of the following, in more-or-less the stated order:
Persistent boot coups may also be related to OS actions. As noted earlier, Windows will sometimes cause repeated problems, which can usually be fixed via bcdedit. Repeated problems in Linux can be caused by by frequent GRUB updates or by a combination of bad NVRAM handling and the fallback.efi program. If GRUB is updating so frequently that's it's causing annoyance, it can be dealt with by use of refind-mkdefault in a startup or shutdown script or by disabling GRUB updates. If fallback.efi is causing you grief, read the following section for information on how to reconfigure it.
Another thing that can produce symptoms similar to a persistent boot coup is Secure Boot. If Secure Boot is enabled on your computer and you install rEFInd without a Shim or PreLoader program, your computer will probably refuse to launch rEFInd. In this case, inserting Shim or PreLoader into the boot process, as described on the rEFInd Secure Boot page, normally overcomes this problem. On rare occasions, though, Shim or PreLoader won't work with a particular computer. In such a case, you may need to disable Secure Boot. Note that this level of Secure Boot malfunction is quite rare. I see many posts in online forums that jump to the conclusion that Secure Boot is causing a problem, when in fact there's another more likely cause. Thus, I urge you to investigate other possibilities before concluding that Secure Boot is causing an inability to boot rEFInd.
One type of boot problem is similar to a boot coup, but has a unique cause: Some EFIs, especially older ones (mostly from 2012 or earlier) have a tendency to forget their NVRAM entries. Such computers boot from the fallback boot loader (EFI/BOOT/bootx64.efi) or from the Microsoft boot loader (EFI/Microsoft/Boot/bootmgfw.efi), but that's about it. A similar problem is that some computers remove invalid boot entries from their boot lists. This is helpful if you delete a boot loader, but it's less than helpful if you temporarily unplug your boot disk and then plug it back in.
In either of these cases, your computer may boot to an unwanted OS or completely fail to boot. One solution to this problem is to install rEFInd to the fallback filename, as described earlier, in The Unstable State: Dealing With Persistent Boot Coups. Another is to use an EFI program called fallback.efi, fbx64.efi, or an equivalent filename on other platforms. To use this program, you would install it to EFI/BOOT on the ESP, either renaming it to bootx64.efi (that is, fallback.efi uses the fallback filename) or installing Shim as bootx64.efi. Shim will try to launch fallback.efi or fbx64.efi when it boots, so either way, this program will launch. (Be sure to match your Shim and fallback.efi/fbx64.efi binaries, so that Shim launches the correct program!) For simplicity, I call this program fallback.efi hereafter.
When fallback.efi launches, it reads every subdirectory of EFI on the ESP except for EFI/BOOT and looks for a file called BOOT.CSV, BOOTX64.CSV, or file with a similar but architecture-appropriate name. If this file exists and contains a UCS-2 (UTF-16 also seems to work) text file, that file is read and used to create a new NVRAM boot variable. The format of BOOT.CSV is simple; it consists of one or more lines, each of which consists of four comma-separated fields:
An example BOOT.CSV file for rEFInd might look like this:
refind_x64.efi,rEFInd,,This is the boot entry for rEFInd
This example is suitable for use with rEFInd if Secure Boot is not in use. (If you're using Secure Boot with Shim, you'd probably specify shimx64.efi rather than refind_x64.efi in this file and give rEFInd the filename grubx64.efi.) This example adds an entry for refind_x64.efi, with a label of rEFInd, to the NVRAM-based boot order list.
One key point is that this file must be a UCS-2 or UTF-16 file. Most Linux (and Windows and macOS) text editors create ASCII files by default. You can use iconv to convert to an appropriate format. For instance, suppose you have an ASCII file called boot.csv in your home directory and you want to write it to /boot/efi/EFI/refind as a UCS-2 file. You could do so in two steps as follows:
$ iconv -t UCS-2 < ~/boot.csv > ~/BOOT.CSV
$ sudo cp ~/BOOT.CSV /boot/efi/EFI/refind/
Depending on permissions on your ESP and the account you use, you could do the same thing in a single step by writing directly to the ESP.
Note that fallback.efi can create boot coups, in addition to fixing them. If it's run inappropriately, this program can modify your NVRAM-based boot list, causing something you don't want to run to become the default boot loader. Thus, if you're experiencing boot coups, you may want to check for the presence of this program and either delete it or adjust the BOOT.CSV files on your ESP. You can find all the BOOT.CSV (and similarly-named) files as follows, assuming the ESP is mounted at /boot/efi:
$ find /boot/efi -iname "BOOT*.CSV"
By default, Fedora and its relatives install fallback.efi in the fallback position (typically launched by Shim, actually) and set up a BOOT.CSV file in the directory that holds the distribution's GRUB. This is good for keeping Fedora booting, but if you want to boot with rEFInd, this configuration can result in a boot coup should the fallback boot loader run for any reason. One way to fix such a problem is to delete or rename BOOT.CSV in the GRUB boot loader's directory and create a suitable BOOT.CSV in the rEFInd directory on the ESP. The refind-install and mvrefind scripts in rEFInd 0.11.0 and later create such a file automatically. This file is harmless if fallback.efi never runs.
Note that fallback.efi does not guarantee the order in which boot entries are created, nor does it provide any mechanism for controlling the boot order when the program runs. These details are determined by the order in which the program locates BOOT.CSV files. Thus, if you have multiple boot loaders with BOOT.CSV files, you'll end up with an essentially random boot loader selected as the default. With any luck, you'll be able to adjust the boot order with efibootmgr, EasyUEFI, or some other program once the system has booted. If your computer completely forgets its boot entries on every boot, though, your best bet is likely to be to delete all the BOOT.CSV files except for the one associated with the boot program you want to control the computer.
copyright © 2016–2021 by Roderick W. Smith
This document is licensed under the terms of the GNU Free Documentation License (FDL), version 1.3.
If you have problems with or comments about this Web page, please e-mail me at rodsmith@rodsbooks.com. Thanks.
Comments on rEFInd and OS X 10.10 (Yosemite)
Return to my main Web page.